Windows Recovery Options
It's important to have a Windows Recovery disk for when the almost inevitable day arrives and your computer will not boot up. We'll be discussing Windows Recovery and System Restore here, with further discussion concerning Dell onboard diagnostics for Dell machine users.
Initial Assessment
Let's try to determine what caused the issue. Some of the questions we need to to ask include:
- Did the issue occur suddenly or is it the result of something else?
- Did Windows do updates recently?
- Did we do other updates recently?
- Have we installed any new software recently?
- Have new peripherals been added?
- How many peripherals are attached?
- Did we install new drivers for new peripherals?
- Was the computer working fine yesterday?
- Is the environment clean, is there dust in the vents?
- Did we install new software recently?
- Is this a power issue? Is the power button LED white, green or amber?
- Are there any blinking LED's?
- Is this a performance issue? Is the system hanging or locking up?
- Does the system shut down or reboot by itself?
- Does the machine blue screen and provide any stop codes?
- Does it boot all the way to Windows or do we get errors instead?
- What errors are we getting if we cannot get to Windows? (write them down or take a photo)
Windows Recovery Tools
We need to make Recovery Tools in case Windows won't start up. Windows is famous for not starting up, do not overlook the importance of a Recovery disk.
Windows Recovery disks are not the same as backup disks. Backup disks copy your personal files. This tool does not backup your personal files and data, although Backup is also available here. We will be making a Windows recovery tool that has the system files that you need to recover with if your computer system fails. You likewise cannot use backup to recover your Windows system in an emergency. In this first example we will use the control panel Windows 7 option. This option is available on Windows 7, 8, 8.1 and 10. It is highly recommended you use the USB option (below) to make a recovery disk for Windows 10 instead of this method.
To get started, lets open the Control Panel.
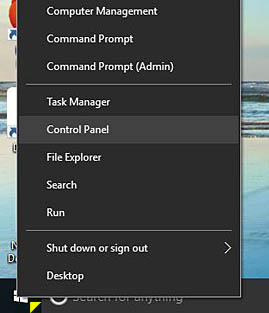
This first method will use a DVD to make a Windows Recovery Disk for your system. Right click on the windows start button in Win 10 (yellow triangle), then click Control Panel. In Windows 7, type 'control panel' in the search bar that appears when you click the start button. In Win 7 you may see Control Panel in your start menu. The start button has the windows logo on it. It is at lower left on your screen.
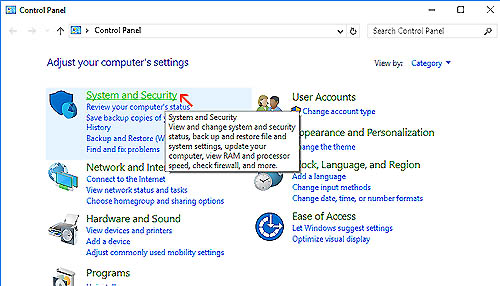
Click on 'System and Security' inside the Control Panel window (red arrow).
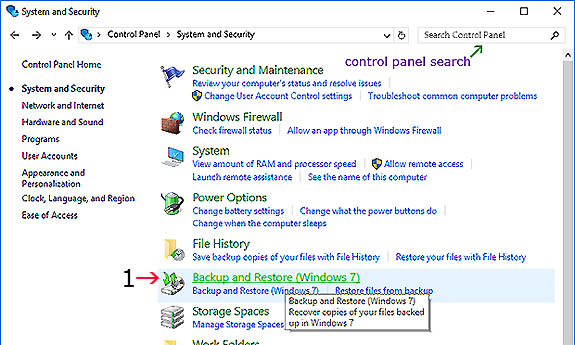
1. Click on Backup and Restore Windows 7 (red arrow).
Save any docs you may have been currently working on and make sure any other programs you may have been using are closed and finished running before proceeding past this point.
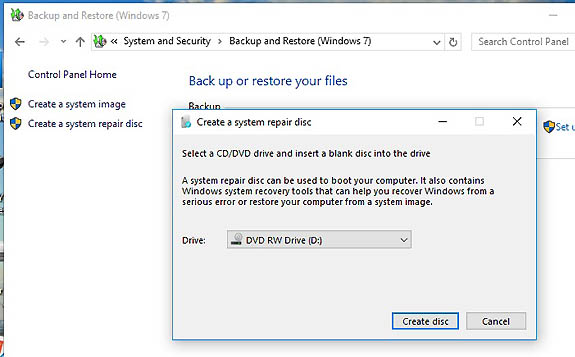
Put a new unused DVD into your computer's CD/DVD drive tray, give it a minute to finish the first read, then click on System Repair Disk in the control panel window. You will be presented with a pop-up. Click the 'Create disc' button and it will start. It takes several minutes to make a DVD recovery disk depending on how much system RAM you have.
The next part is for Windows 10 only. In Windows 10 there is a USB Recovery Disc tool in the default windows applications menu.
Put your thumb drive into a USB slot on your computer. Any available USB slot is fine. Click the start button (orange arrow) at lower left on your screen and then scroll down alphabetically in the programs and applications menu to the W category, click on Windows System. You will see subcategories. Click on 'Create USB Recovery' (yellow arrow).

Click on 'Create USB Recovery' (yellow arrow).
You will be presented with a Recovery Drive pop-up. Make sure the little checkbox (1) is checked.
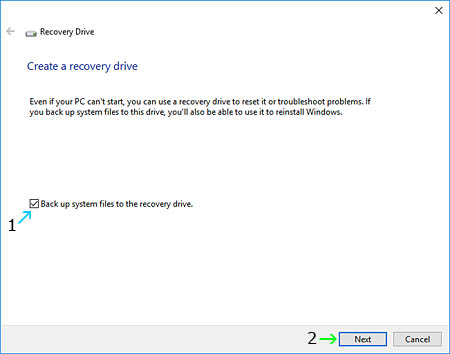
1. Check the checkbox (blue arrow). 2. Click the 'Next' button (green arrow).
The Recovery Disc application will start. It takes several minutes to make a USB Recovery disc.

When the Windows System Recovery program is finished working you will be presented with a window that states the application has finished successfully. Click on the system tray and safely remove your USB thumb drive from there. It is not good to just pull a thumb drive from the machine. It's wise to shut the system down and then try to boot from the USB disc at this point to make sure it works. Depending on your computer's manufacturer, you can use various options to try to boot from the USB thumb drive. On a Dell system, you want to power the machine back on and then immediately start tapping the F12 key on your keyboad to get the optional boot menu. Select the USB drive (UEFI if Windows 10) and boot it up. If it starts the program from the USB then your recovery disc is successful. Shut the system down by canceling recovery at the first available option to do so, or you can try alt-ctrl-del to shut down also. Or just use the power button to shut down. Remove the thumb drive from the USB slot, power back on and boot back to Windows normally.
Create a System Restore Point
Dell Epsa Onboard Diagnostics
Cover F2 to Bios, FN + power on to epsa, F8 to safe mode in win 7, F12 to Boot menu Hard Drive Failure or corruption
Display LCD BIST
Cover remove battery, do flea release, remove all peripherals D + power windows + p for display choices if multi
Assess No Power No Post
Hard Drive Failure
Assess Hard Drive Failure